The missing guide to deep linking in Flutter apps - Part 1, Android
Google Developer Expert in Flutter & Dart 🚀| Mobile App Development 📱| Tech Advocate 🌐| Women Who Code KL Director
This guide is meant to complement other resources out there. I will include the links to those resources useful to me in this article, but I would try not to repeat what was already out there (unless it was confusing).
What you can achieve by the end of this guide:
Tapping on a link like
https://your-domain.com/detailswould lead to opening a specific screen of your app.If you are looking to use a custom scheme like
myscheme123://detailsthen this guide is not for you. You may check out theapp_linkspackage.
What you need to do:
Configure the routes in your Flutter project
Configure
AndroidManifest.xmlHost
assetlinks.jsonfile on your web server (forhttp/httpsscheme)Test it with
adbcommands (you can already validate your setup withadbcommands, even without hosting the file)
What you need to know:
There are two ways to configure deep linking or app linking in Flutter:
go_routerorapp_links(oruni_links), each of them has their specific behaviour and setups (see section below)The fingerprints in the
assetlinks.jsonfile matter - this would determine whether tapping on your custom link will automatically open your app
Now let's get started.
go_router or app_links ? (or both)
This depends on your use case. I like how easy it is to set up with go_router , but it comes with a huge limitation (which is often critical to me). So when you use go_router, you set up the GoRouter instance as usual, plus a one-line setting in AndroidManifest.xml and then the deep linking setup on the Flutter part is done - however, the underlying behaviour of the navigation with this approach is equivalent to context.go(<path>), which means you lose your navigation stack the moment you're navigated to the <path> you specified. Which is often a dealbreaker for me, ugh. (See this article for the difference between go and push, though I don't agree with the author saying we should avoid using push as much as possible, push is still useful for mobile-only apps, and some cases like dialogs)
For setup with app_links, it's a bit more complicated, see here for detailed setup. I would avoid uni_links and Firebase Dynamic Links by the way - uni_links has not been updated since two years ago, and Firebase Dynamic Links is officially deprecated. Here is my setup:
// At a top-level widget
class App extends StatefulWidget {
    const App({super.key});

    @override
    State<App> createState() => _AppState();
}

class _AppState extends State<App> {
    late final AppLinks _appLinks;
    StreamSubscription<String>? _linkSubscription;

    @override
    void initState() {
        _initDeepLinks();
        super.initState();
    }

    @override
    void dispose() {
        _linkSubscription?.cancel();
        super.dispose();
    }

    Future<void> _initDeepLinks() async {
        _appLinks = AppLinks();
        _linkSubscription = _appLinks.allStringLinkStream.listen((url) {
            router.push(url); // with your GoRouter instance
        });
    }

    @override
    Widget build(BuildContext context) {
        return MaterialApp.router(
            routerConfig: router,
            builder: ...
        );
    }
}
In my projects I usually use both go_router and app_links - because I like the declarative routing API in go_router, and app_links I need for achieving context.push(<my_deeplink_path>) . (I really wish go_router could let us customise this behaviour so I can get rid of the app_links dependency...)
Configure AndroidManifest.xml
This is the key component to configure for Android deep links to work. Here is what the official Flutter guide ask you to do:
 <meta-data android:name="flutter_deeplinking_enabled" android:value="true" />
 <intent-filter android:autoVerify="true">
     <action android:name="android.intent.action.VIEW" />
     <category android:name="android.intent.category.DEFAULT" />
     <category android:name="android.intent.category.BROWSABLE" />
     <data android:scheme="http" android:host="example.com" />
     <data android:scheme="https" />
 </intent-filter>
Put this under the main <Activity> (you should only have one Activity for your Flutter app anyway), replace the android:host value accordingly, and you're good to go. Note that if you are relying on app_links to do the navigation you should remove the line with the flutter_deeplinking_enabled . The autoVerify=true is to make sure that Android will automatically try to verify your app with the host you specified, so that the app association with the host is established. Users can still manually override this, of course. You can later check that behaviour in your Android device / emulator when you have the app installed after this is configured (select your app, go to "App Info", then go to "Open by default"):
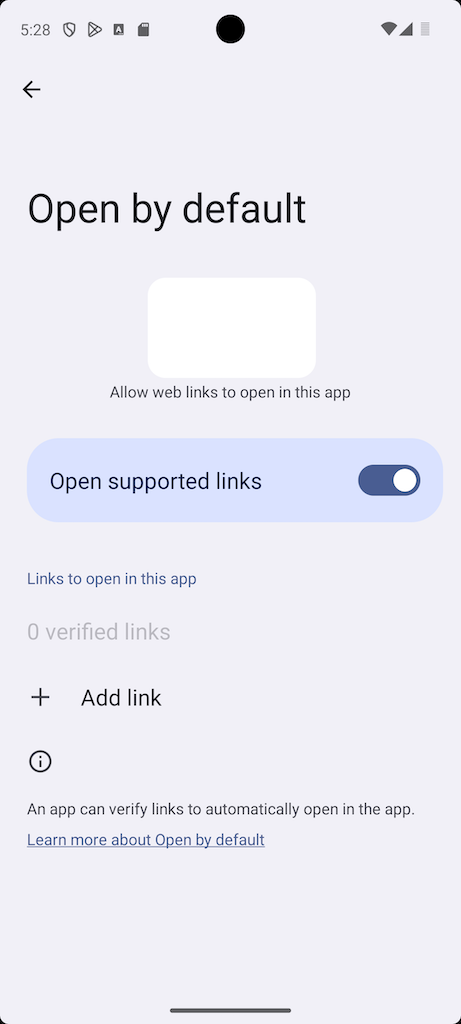
Only after completing all the steps in this guide you would see your domain being specified in the "verified links". You can manually add link, of course, but you cannot expect your users to do that. So be patient and follow through the rest of the setup.
Side note: The default android:launchMode of Flutter activity is singleTop , however, as pointed out here, opening the app link would end up triggering another instance of your app, which is sub-optimal. Setting the launch mode to singleInstance is better, plus avoiding task hijacking altogether when you also set android:taskAffinity="" in the <application> tag.
Create assetlinks.json and host it on your web server
Steps listed here is good enough, but there are a few things worth mentioning:
- The SHA256 fingerprints from the Google Play Developer Console is good enough for builds that are released via Google Play. This is due to the fact that the fingerprints are generated from the keystore used to sign the APK - you might be relying on Google Play's own provided keystore, or you may have uploaded your own. Either way, if you also want to test locally in the debug mode, you need to also add the fingerprint of your debug keystore (often located in
~/.android/debug.keystorein Mac systems) into theassetlinks.jsonfile. To get the signature of your keystore, run this in your terminal:keytool -list -v -keystore <path to your keystore>.
You can use a single assetlinks.json file to support multiple app bundles, e.g. if you have multiple app flavours, you can do:
[
  {
    "relation": ["delegate_permission/common.handle_all_urls"],
    "target": {
      "namespace": "android_app",
      "package_name": "com.example.myapp.dev",
      "sha256_cert_fingerprints": [
        "<fingerprint_one>",
        "<fingerprint_two>"
      ]
    }
  },
  {
    "relation": ["delegate_permission/common.handle_all_urls"],
    "target": {
      "namespace": "android_app",
      "package_name": "com.example.myapp.qa",
      "sha256_cert_fingerprints": [
        "<fingerprint_one>",
        "<fingerprint_two>"
      ]
    }
  },
  {
    "relation": ["delegate_permission/common.handle_all_urls"],
    "target": {
      "namespace": "android_app",
      "package_name": "com.example.myapp",
      "sha256_cert_fingerprints": [
        "<fingerprint_one>",
        "<fingerprint_two>"
      ]
    }
  }
]
Allow some time after reinstalling the app for Google to pick up the association. Google suggests waiting at least 20 seconds for the asynchronous verification to complete.
Tips if you don't have a web server: You can use Firebase Hosting and upload the
assetlinks.jsonas a static file (make sure the final path is.well-known/assetlinks.jsonand the domain is what you created in Firebase Hosting).
Test with ADB commands
Now if you have done everything right, you can type a URL in a separate app (e.g. in a Note app, or send an email to yourself, or type in a Google Doc) and then tap on the URL (note: typing or pasting the URL in the browser would not work!), you will see the auto-navigation to the specific screen of your app. But, if something is not right, you can debug and test with adb commands:
adb shell 'am start -a android.intent.action.VIEW -c android.intent.category.BROWSABLE -d "https://dev.example.com/product-details"' com.example.myapp.devto test if it opens the correct screen of your app (would still work even if the host association is not done)adb shell dumpsys package com.example.myapp.devto check everything about this package including the host association and auto-verification status
And that is it! I will write about the setup for iOS in the next part.